
Well first thing's first: Why?
Why on earth would we take that perfectly good running air-cooled motor that I recently put brand new cylinder heads on and throw it out for a completely different power plant?
Well for one, if the PennyWagon was simply a weekend adventure vehicle, I wouldn't; but she's far more than that.
The PennyWagon is our home, and we don't pack light. That means all our extra weight, consisting of our toys, clothes, hygiene products, water, food and such is making an already extremely slow van far beyond sluggish. Even with all that, she actually drives surprisingly well. But weight is only part of the reason we're pulling the trigger. The combination of the weight, this van being our home AND the absolutely extreme driving we're asking it to accomplish is why we're finally taking the plunge. The current motor simply lacks the cojones to accomplish what we need it to do.
Perhaps a little back-reading to I Don't Know could refresh your memory on how this little motor proved itself incapable of hauling our 5000lb asses up 20% grades at 6700ft in the middle of Guatemala. Which is only the beginning of the hardships we're going to ask her to endure.
Our demands upon this machine are great so we need a power plant that is something superb. A power plant that can handle extreme weight, altitude, grades and a completely undependable supply of gas stations and parts-houses. We need a motor that can fit in the compact engine bay, is extremely fuel efficient and has little to no electronic components. Something that isn't going to starve for air in the mountains, and in an emergency, parts can be purchased anywhere in the world.
So after much number crunching, numerous power plant comparisons, we're doing a VW TDI. Not just any TDI either. An m-TDI. Translation: A fully mechanical (computer free) turbo diesel engine. No electronics, no ignition system, lots of low end grunt power, cheaper fuel prices and better mileage.
To clear things up, you can't just buy this motor. Any TDI is an electronic infested beast. Even the earliest models of them had electronic gas pedals. Imagine that, I'm in the middle of the Peruvian desert and my gas pedal sensor goes out so the van won't drive. Where am I going to buy one of those? Maybe it's just because I'm a mechanic, but having all those extra potential failure points scares me.
I'm having a shop in Ontario, CA called Quality German Auto Parts take a TDI engine and rebuild it to be completely mechanical. New school power with old school workings. The entire engine will require a single wire to run. In fact once a diesel is running, they don't actually require any electricity at all.
So as promised, the m-TDI DIY projects are rolling out. Now our motor is taking a smidge longer in the shop than anticipated, so I've been trying to do as much preparation as possible. After all, with our plan being to rent a DIY mechanic shop, every hour of work I can do before we rent the lift saves us money.
For those of you interested in doing this to your air-cooled Vanagon, this is simply how I went about it. I make no claims that this is the only way or the best way, but I'm certainly getting the job done. I apologize if everything isn't explained perfectly or if every photo isn't snapped. But at the same time, this kind of project requires a bit of creativity and ingenuity. Not everything is going to fall perfectly into place, so if you aren't comfortable filling in the blanks, I'd recommend more research or hiring help before undertaking something of this nature.
To adapt my van to this motor requires quite a few things. I need a cooling system (my current engine doesn't require liquid to stay cool but the new one does). I need a cradle since something has to keep the new motor from dragging on the ground. I need to make the engine actually bolt to the transmission, because it currently won't. I need to plumb the air. In other words it needs filtered air to enter, then the compressed air from the turbo needs to be cooled before finally entering the engine. Finally, I need to do all the electrical for the new systems being built.
I've got five categories to cover today:
- Cutting the hole for the grill
- Installing a radiator
- Wiring up the radiator
- Installing an intercooler
- Installing a heater core
Cutting up that face!
A quick flash-back to our time at Overland Oasis in Oaxaca. The very, very beginning of our prep was completed there when Calvin and I prepared the big hole in PennyWagon's face for the soon to come radiator.
I magically managed to come across a lower Vanagon grill in a mechanic shop in the middle of Guatemala. However I didn't have all the factory mounting clips or another van to compare with for cutting. So after looking online at photos and measuring the mounting holes on the grill, I committed to cutting Penny's face. For fastening the grill I used generic license plate screw tabs, bought from any auto parts store, pressed into the vans face so I could attach the grill with actual fasteners instead of the factory plastic clips. I also used some rattle-can paint and rubber trim to help prevent rust.
Cutting the nose of our Vanagon in prep for the Radiator install down in Oaxaca, MX.


Installing a Radiator
Obviously the next logical step would be to install the radiator that has been waiting so patiently for me in Southern California. I did plenty of research and staring at my Bentley manual to make sure I bought everything needed. I also had big help from a friend Nick who was originally planning to convert his air-cooled to water-cooled. Since he changed his mind and is an extremely nice guy, he hooked me up with all the parts that otherwise would've been sourced from a junkyard.
Shopping list:
- Vanagon radiator
- Factory radiator lower mounting brackets (Junkyard item)
- Factory radiator wiring harness (Junkyard item, or make one from scratch)
- Radiator Baffle Set
- Radiator Temp Switch
- Radiator fan with shroud (shroud is a Junkyard item, fan can be purchased new)
- Upper and lower rubber radiator washers
- Upper radiator mount (Junkyard or fabricate)
I was rather surprised to find how prepared the air-cooled Vanagon is to become water-cooled. It seems the engineers at VW probably found it cheaper to make the air-cooled and water-cooled vans essentially the same. The mounting slots are already there so upper and lower radiator mounts can simply bolt in...if you have them. Since I had the lower mounts from Nick I just had to pick up some fasteners. The upper mount I made out of 1'' aluminum square bar and two L-brackets. Super easy and rust proof. Even the hole into the cab for the electrical was already drilled. So I simply passed the wires through the hole above the left headlight to deal with at a later time.
In order: First shows the factory 1986+ fan and shroud attached to the radiator. Second photo shows the giant radiator harness hanging out of the nose of the van after I passed it through a factory-pre-drilled hole above the headlight. Third I've attracted an audience. The last three images show the radiator installed with a baffling set I bought from GoWesty. The lower mounts are completely stock and self explanatory once you crawl under the van..


Radiator Wiring
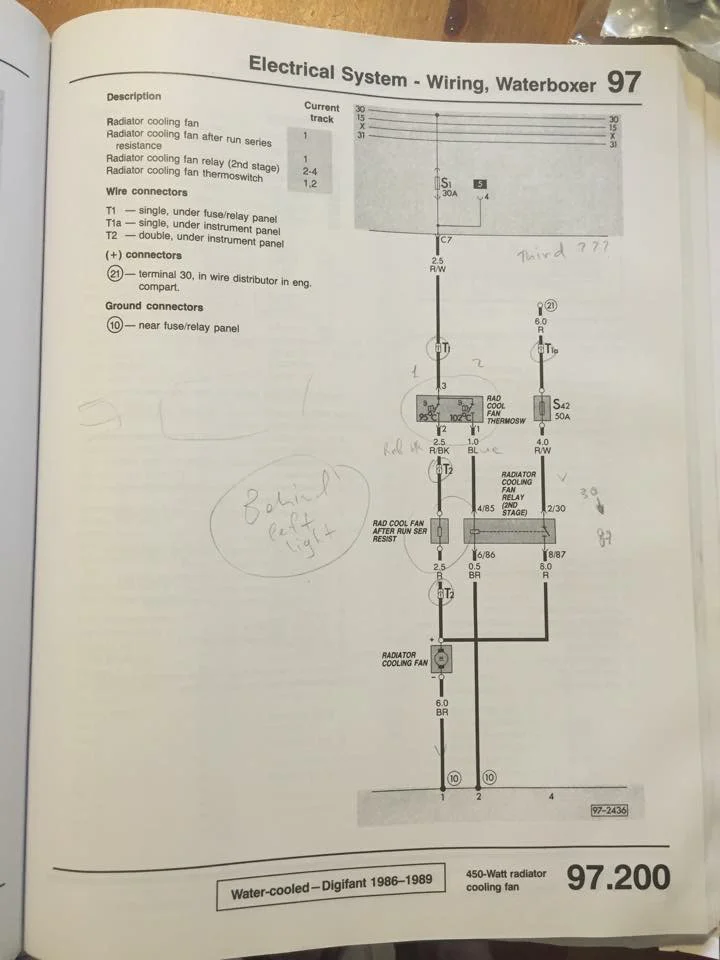
Next up is wiring the radiator. As I mentioned before I already had the factory radiator wiring harness that my friend Nick cut out of a junkyard van and sent to me. So I really just needed to make sure it was hooked up to the two-speed Vanagon fan resistor, the temp switch in the radiator, then give the whole thing power and ground. I attached the fan relay along with an accessory fuse panel behind the dash on the A-Pillar. This also allowed me to clean up some other accessory wiring while I was in there.
Factory radiator harness mounted on the A-pillar behind dash. Under is an accessory fuse block with direct, but fused, power from the battery. In other words the van does not need to be on for the fan to operate. It's completely controlled by the temp-switch inside the radiator. Don't forget to use a label-maker in case you ever sell your van. You don't want to completely screw the next owner when they try to figure out what you've done. Since my van is using the 86+ cooling system and no a/c I loosely based my wiring off of the below diagram taken from the Bentley manual.

Intercooler Build
Next up I decided to try and conquer the other radiator that is unique to turbocharged engines...the intercooler. Since the engine we're using is turbo charged, the air entering the engine is pressurized and hot. That air needs to be cooled for the sake of engine longevity. After many, many trial and error sessions I came up with a shockingly simple design for mounting the intercooler.
Shopping list:
- 1995 Saab 900 Intercooler (Used on ebay)
- 7'' cooling fan
- Angle iron
- Two rubber grommets
- Rivet-nut and various fasteners
The reason I pickup the Saab intercooler is how amazingly well it fits in the D-pillar AND the fact that both ports are on the same side (which adds to the fit). I have to thank people like Karl from Westy Ventures for giving me so many good pointers on what to use for this build.
Now, the Saab intercooler is designed to be mounted from three spots. There are two nipples at the back and a single hole, for a single fastener, at the front. So that's where the angle iron and rubber grommets come into play. Find the tightest fitting grommets for the nipples, bend your angle iron into a 45 degree angle and mount/suspend the back of the intercooler in the grommets as "picture two" clearly shows. The extra angle iron in the front gives you something to bolt onto and helps direct air into the intercooler. Ignore the fact that I drilled two holes on the upper mount, that's just a bit of trial and error.
Once it's mounted firmly, you need to remove the taillight and address how much air is going to escape around the side of the intercooler. I used simple galvanized sheet metal, a vice and a bit of creativity. The fan is optional, but I decided it would help with temperatures on slow hill climbs. Also I plan on riveting an extra piece of sheet metal to the left side of my home made shroud to close off some additional air holes. Let's just call this shroud version 1.0.
The first picture clearly shows the Saab intercooler with the 7'' fan mounted on the face. Picture two shows all three mounting points for the intercooler. Three shows the intercooler mounted from within the engine bay and four/five is the view through the driver's taillight hole. The final image shows version 1.0 of my fan shrouding seen through the taillight opening.


Heater Core
The last pre-swap project covered in this post is conquering the thing that seems to scare most people interested in air-cooled to water-cooled swaps. The heater-core. The heater-core is yet another radiator that is going to be installed in the van. Unlike the normal radiator that maintains engine temp, and the intercooler that cools air temp, this little radiator uses the hot coolant to actually heat the air entering the cabin. Hello working heater in winter!
In my time as an auto mechanic I've done my share of heater-cores, and they are usually nightmare jobs. Lots of plastic, easily breakable parts, and trying to completely remove some monstrosity of a dashboard from a car the engineers probably assumed you'd throw away long before it needed a new one. Regardless...
Shopping list:
- Vanagon front heater core
- Angle grinder
Again I can't stress how this was by far the easiest dash I've ever pulled, and the easiest heater core I've ever installed. It's like this van wants to be water-cooled. Once the dash is out, which is simply held by 9 screws (don't forget to liberally disconnect all the electrical and batteries) it lifts out pretty simply. Six more phillips head screws later and the entire airbox is in your hands and ready for disassembly. The two halves are held together by metal clips and after removing a "heater-core-shaped" piece of plastic from inside the box, your new heater core drops in.
I only had to make three cuts. On the side of the airbox, where there is a clear factory outline, you cut a hole for the nipples of the heater core. Then you need to trim a few inches off one set of the flappers so they don't hit the heater core. Then reassemble everything. I also recommend buying a bunch of weatherstripping for doors from a local hardware store to reseal everything to the dash while you are in there.
The first and second image clearly shows the dash removed and our giant airbox bolted in dead center. Image three is the airbox removed, opened and unmodified. If you look at the dustiest section of it, that entire hunk of plastic lifts out and is replaced with the heater core. The fourth image is the heater core dropped in where the huge hunk of plastic used to be and it fits like a glove. Image five is the little flappers that fit directly over the heater core. As you can see in that image I've cut an inch or so off to make them stop hitting the heater core. Then it's lots of cleaning to get 30 years worth of dust out of the van before reassembly.


So...after tons of research, shopping and prep, phase one of our Air-Cooled to M-TDI motor swap is complete. Now I just need the engine!!
To be continued....
Motor Swap Part 2
Paying a visit to Thomas at Quality German Auto Parts. This is the shop preparing my engine.